how to force fsck on next boot or reboot ?

0 comments
Due to the deletion of the data, I concluded that data with old date stamps or older data was deleted first rather than newer data. Am I foolish in the above conclusion ? If so, please post a comment or email me without any hesitance.

I was immediately in debian irc and a kind person has informed or more precisely educated me about how to force check the file system at next reboot or boot.

By default Debian forces file check after 30 boots or 180 days, whichever comes first. In order to override the above defaults, you can give the following command.

# touch /forcefsck

If you give the above command, it will check your data on next boot.
If you are impatient, then give the following command [ please close all open programs and save the data before giving the command ]

# reboot

There is also another method, If you are familiar with shutdown command, you can use :

# shutdown -Fr now

-F will force fsck to run on reboot
-r reboot after shutdown

By the above two methods you can force fsck to run.

The End.
 
 
Creative Commons License
This work by maniac.vardhan is licensed under a Creative Commons Attribution-NonCommercial-NoDerivs 3.0 Unported License.


tata indicom wimax connection users using debian GNU/linux

0 comments
If you do have an internet connection from tata indicom and using debian GNU/linux lenny as your OS.

I really don't trust GUI interfaces in Debian. sometime they trick us.

I have called couple of times Customer Care people and they don't know how to troubleshoot the issue of connectivity particularly for Debian.

I assume you have dynamic ip.

As usual, I did some research and found a solution.

You need exactly two packages and a little patience.

The two packages are :

[1] dhcp3-client

[2] dhcp3-common

When you don't have an internet connection, follow the following steps :

Step 1 :
# dhclient -r
the above command will release your ip. sometimes it shows some errors. don't bother about them. give the command atleast more than 2 times.

Step 2 :
# dhclient

the above command will try to provide an ip address.

If you follow the above two steps your internet connectivity will be again online.

The End.
 
 
Creative Commons License
This work by maniac.vardhan is licensed under a Creative Commons Attribution-NonCommercial-NoDerivs 3.0 Unported License.


how to view memory information in debian GNU/linux lenny ?

0 comments
To view information about free RAM available in your system [ Memory + Buffers + Swap ]

$ free

To view the Memory Controller, Memory Module, Physical Memory Array, Memory Device :

# dmidecode -t memory

What is dmidecode ?

Reports information about your system's hardware as described in your system BIOS according to the SMBIOS/DMI standard.

To know more about the dmidecode, click http://www.nongnu.org/dmidecode.

The End.
 
 
Creative Commons License
This work by maniac.vardhan is licensed under a Creative Commons Attribution-NonCommercial-NoDerivs 3.0 Unported License.


how to identify the processor (CPU) in debian GNU/linux lenny ?

0 comments
There are more than 4 ways to view the information about CPU through command line :

To view the processor installed :

$ cat /proc/cpuinfo

To know the information stored in dmi zone of motherboard about the CPU and CPU's cache :

# dmidecode -t 4

To know about CPU frequencing :

$ cpufreq-info

To view the CPU ID information :

$ cpuid

By default cpuinfo, dmidecode & cpufreq-info are installed in Debian Lenny. You need to install cpuid package in order to view the CPU ID information.

Install cpuid

# aptitude install cpuid

The End.
 
 
Creative Commons License
This work by maniac.vardhan is licensed under a Creative Commons Attribution-NonCommercial-NoDerivs 3.0 Unported License.


how to know whether to upgrade the debian GNU/linux ?

0 comments
All of are interested to keep our system updated and secured.
There are many ways to update the system.
In order to update the system packages we run :

# aptitude update


In the output of the above command we can know whether system can be upgraded to install security or update packages. At the end of the execution command, you can view the following line :

current status : 1 update [+1].

If the above line is present, we can upgrade the system.
In the picture below, view the line highlighted in colour.


This is how we know whether system can be upgraded.

The End.
 
 
Creative Commons License
This work by maniac.vardhan is licensed under a Creative Commons Attribution-NonCommercial-NoDerivs 3.0 Unported License.


how to view broken packages in debian GNU/linux lenny graphically ?

0 comments
Most of the time, we find a package to be interesting or useful and install it right away. The installed package might be used once or twice only. The issue of depencies arises if you mix stable with other branches, and the uninstalled packages might create broken packages.

To view the broken packages, follow the steps given below :

Step 1 : Check whether you have installed synaptic package on your system :

$ aptitude show synaptic

If the package is already installed, it will show state as installed as shown in the image below. If the package is not installed, it will show state as no : state:no.


Step 2 : If synaptic is already installed, skip Step 1 and Open synaptic package manager from System Tools. It requires administrator password to open and use synaptic.

Step 3 : Click Custom Filters and select Broken as shown in the image below. After selecting Broken you can view the broken packages list. If there are no packages listed, that means your system free from broken packages.


The End.
 
 
Creative Commons License
This work by maniac.vardhan is licensed under a Creative Commons Attribution-NonCommercial-NoDerivs 3.0 Unported License.


can not open ‘/var/lib/mlocate/mlocate.db’ : No such file or directory.

0 comments
You might have encountered the above error at least once in your lifetime. There is a simple solution for the error. I assume that you are running Debian GNU/linux Lenny.

Step 1 : Open your terminal.

Step 2 : Login to your root account by typing su as shown in the figure below and provide password :

$ su

Step 3 : After logging into the root account, type the following command as shown in the image below and press the enter button :

# updatedb.mlocate

Step 4 : Logout of the root account and start searching your system.

The End.
 
 
Creative Commons License
This work by maniac.vardhan is licensed under a Creative Commons Attribution-NonCommercial-NoDerivs 3.0 Unported License.


easy way to view .chm files on debian GNU/linux lenny

0 comments
I am comfortable with minimal packages on my system. It's very easy to manage few packages. I have downloaded a guide and the guide is only available in .chm format. So, I was planning to install a suitable package to view the .chm file. The help manual of virtualbox is in .chm format. If I am able to view the help manual, why can't I view my downloaded .chm file ?

The above question has made me to introspect the issue and I have come up with a solution.

Follow the steps given below in order to view .chm files on lenny. I assume you are using Lenny 5.0.4, LXDE and Virtualbox 3.2 installed on your system.

Step 1 : Run Virtualbox and press Help -> contents or press F1 as shown in the image below :


Step 2 : You can view about kchmviewer on the help manual as shown in the image below :


Step 3 : Open a terminal and type the following command in order to view the path of the kchmviewer. Don't close the window of virtualbox help manual until Step 4.

$ ps aux | grep kchmviewer


Step 4 : Note down the path of the kchmviewer on a text file. The path to my kchmviewer is shown below :


/usr/lib/virtualbox/kchmviewer


Step 5 : Right click your .chm file and click "Open with" and click "open with another program".


Step 6 : Type the path of kchmviewer as determined in the Step 4 or click browse as shown in the image above.

Step 7 : Check the box of "Set selected application to default action" as shown in the image of Step 5. Click OK.

Step 8 : Click the .chm file to view.

This is how I am viewing .chm files without installing any extra packages.

The End.
 
 
Creative Commons License
This work by maniac.vardhan is licensed under a Creative Commons Attribution-NonCommercial-NoDerivs 3.0 Unported License.


how to extract .chm file contents using kchmviewer ?

0 comments
Prerequisites according to my experience : Debian GNU/linux Lenny 5.0.4, LXDE, Virtualbox 3.2.

Step 1 : Open the .chm file from which you want to extract contents.

Step 2 : Click on the File menu as shown in the image below :


Step 3 : Click "Extract CHM content" as shown in the image of Step 2.

Step 4 : It will pop up a window enquiring you where you want to save the files as shown in the image below :


Step 5 : Locate your extracted content folder and search for index.html file and click it. You can view the .chm file in browser.


The End.
 
 
Creative Commons License
This work by maniac.vardhan is licensed under a Creative Commons Attribution-NonCommercial-NoDerivs 3.0 Unported License.


Passwd : Authentication token lock busy.

0 comments
When we try to change the root password during the boot, we encounter this error. There is only a single explanation for this situation. The file system does not have sufficient read and write permissions.

The error might look like this :


In order to remount the filesystem in read and write mode type the following command :

# mount -o remount,rw /


The above step paves you the way to change root password.

The End.

p.s. All the screenshots are from my virtualbox machine. The real world screens might be somewhat different.
 
 
Creative Commons License
This work by maniac.vardhan is licensed under a Creative Commons Attribution-NonCommercial-NoDerivs 3.0 Unported License.


how to reset forgotten root password on debian GNU/linux lenny ?

0 comments
Prerequisites : Debian GNU/linux Lenny 5.0.4, GRUB boot loader.

Read the whole post and then attempt to change root password. By default, you can edit entries in grub boot loader within five [ 5 ] seconds only.

There are two [ 2 ] situations depending upon your boot list.

Situation A : You have single user mode option in Grub boot loader.


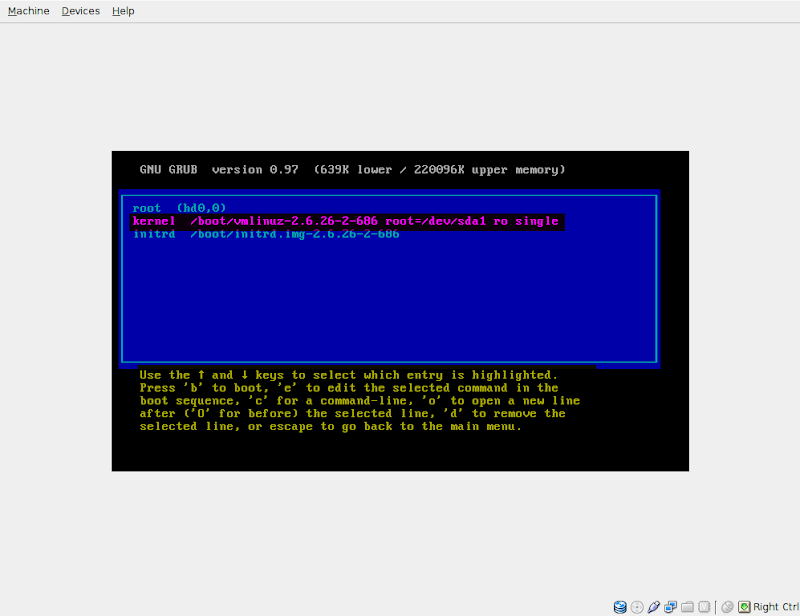
Step 1 : Boot your system and wait for the grub to load. Select the Debian/GNU Linux, kernel 2.6.26-2-686 [ single-user mode ] with the down arrow or mouse and press e. The single user mode is highlighted in the image shown below :


Step 2 : Select the single-user mode using up or down key on keyboard : kernel /boot/vmlinuz-2.6.26-2-686 root=/dev/sda1 ro single. After selecting the single user mode, press e to edit the entry. Please read the text highlighted in yellow colour or on your system.


Step 3 : Append the following command at the end of the entry as shown in the image below. Notice that there is a space between single and init.

init=/bin/sh


Step 4 : Press enter after typing in the code given in the Step 3. It will show you the edited entry highlighted.


Step 5 : Press "b" [ on your keyboard ] and the system starts booting. It might look like this :


Step 6 : After the system has finished booting, it will provide you with a root prompt :


Step 7 : In order to avoid the error : "Passwd: Authentication token lock busy", type the following line at the root prompt. The command allows you to remount the filesystem in read write mode. After typing the command, press enter.

# mount -o remount,rw /


Step 8 : Type passwd at the root prompt in order to change the root password of your Debian Lenny OS and press enter.

# passwd


Step 9 : It will give a prompt you to provide a new password and type your new root password. This step allows you to change the root password. You have to provide only your new root password.


Step 10 : If everything goes correctly, it will show the message "passwd: password updated successfully" as shown in the image above.

Step 11 : Type the command given below in order to halt the system.

# halt


Step 12 : Power off your desktop or laptop.

Step 13 : Login into your user account and try to access your root account in a terminal :

$ su


By following the above steps you have successfully changed your root password.

Situation B : If there is no single-user mode option in boot loader :


Step 1 : Boot your system and wait for the grub to load. Select the Debian/GNU Linux, kernel 2.6.26-2-686 with the down arrow or mouse and press "e". The single user mode is highlighted in the image shown below :


Step 2 : Select the kernel using up or down key on keyboard : kernel /boot/vmlinuz-2.6.26-2-686 root=/dev/sda1 ro quiet. After selecting the single user mode, press e to edit the entry.


Step 3 : Append the following command at the end of the entry as shown in the image below. Notice that there is a space between quiet and init.

init=/bin/sh


Step 4 : Press enter after typing in the code given in the Step 3. It will show you the edited entry highlighted.


Step 5 : Follow the steps from Step 5 as given in Situation A.

p.s. All the screenshots are from my virtualbox machine. The real world screens might be somewhat different.

The End.
 
 
Creative Commons License
This work by © 2012 maniac.vardhan is licensed under a Creative Commons Attribution-NonCommercial-ShareAlike 3.0 Unported License.

issue with apt-get using proxy server to connect internet

0 comments
source : debian-user-digest # 1163.

[ A ] : add this line to my /etc/bash.bashrc :

export http_proxy="http://username:password@proxyserver.net:port/"

[ B ] : Probably one of your configuration files was replaced during the upgrade. The original will have been preserved with the extension .dpkg-old.

You might also add :

export ftp_proxy=$http_proxy
 
 
Creative Commons License
This work by maniac.vardhan is licensed under a Creative Commons Attribution-NonCommercial-NoDerivs 3.0 Unported License.


echo $http_proxy both as root and as user

0 comments
source : debian-user-digest # 1167.

adding it in /etc/bash.bashrc. That should work for all users.

export http_proxy="http://url:port"
 
 
Creative Commons License
This work by maniac.vardhan is licensed under a Creative Commons Attribution-NonCommercial-NoDerivs 3.0 Unported License.


md : Stopping all md devices and unable to reboot

0 comments
source : debian-user-digest # 1183.

[ A ] : Read this : http://blogs.koolwal.net/2009/08/04/howto-fix-linux-hangfreeze-during-reboots-and-restarts/

[ B ] : If those suggestions don't work, try acpi=off as a boot parameter.
See the documentation for your boot loader for implementation details.
Kernel boot parameters are specified differently between LILO and Grub/2.
If all of these fails to solve the problem, disable power management completely in the BIOS setup if it has such an option.
 
 
Creative Commons License
This work by maniac.vardhan is licensed under a Creative Commons Attribution-NonCommercial-NoDerivs 3.0 Unported License.


cloning or saving system

0 comments
source : debian-user-digest # 1191,1203,1204.

How can I clone/transfer my current working machine with all it's files/programs like thunderbird/iceweasel etc to the another machine and still retain a working system ?

[ A ] : put the old HD into the new computer, boot up to Linux ( you might have to edit Grub at this point ) then dd the MBR to the new drive on the new computer, then sync the rest of the drive either using rsync, copy or dd. Then move the HD's back in their original places and edit grub again.

[ B ] : you could just use Clonezilla.

[ C ] : if you want to have a basic clone ( not an exact copy ) of a machine, what I end up doing ( which allows me to provision a machine in about 15 minutes ) uses the following procedure :

Step 1 : Create a package list on the old machine [*]

$ dpkg --get-selections | grep -v deinstall > pkglist.hostname

Step 2 : ( Optional ) Capture the drive layout [*]

$ df > driveinfo.hostname

$ df -h >> driveinfo.hostname

# fdisk -l >> driveinfo.hostname

Step 3 : Build the new machine with the netinst or businesscard cd. When asked what type of system to build ( package selection ), uncheck all the boxes.

Reboot into your new system, copy pkglist.hostname from step 1 onto the machine. I usually copy at least /etc/apt/apt.conf, /etc/apt/sources.list ( I use a universal one, so one size fits all ), and /etc/apt/sources.list.d over. Do the following :

# dpkg --set-selections < pkglist.hostname

# apt-get dselect-upgrade

This should give you a system with a nearly identical set of packages that you can then tweak to your hearts content.

[*] You can actually back these files up and have a pool of different "types" of machine. For instance, I have a workstation packagelist, a laptop list, as well as lists for the various types of bastion hosts in my network, including a wiki host (mediawiki), firewall, backup server, etc.


[ D ] : if you are managing more than a few boxes, you also might want to consider a configuration management tool like cfengine or puppet. Then you could "script" all of your UIDs and GIDs as well as other configuration details. For instance, I have a list of "essential" packages ( essential for me ) that I install on every box. With cfengine, I can automagically install them as well as edit/modify that list in one place.

Finally, backing up /etc and restoring it later prevents you from having to do all the configurations again.
Be careful with that. Especially if you are "cloning" a box that has been around for a while. Carte blanche copying of /etc can lead to problems. There is the problem of "etc drift," even with a fairly recently built box.
 
 
Creative Commons License
This work by maniac.vardhan is licensed under a Creative Commons Attribution-NonCommercial-NoDerivs 3.0 Unported License.


how to stop mail system messages to /var/log/syslog

0 comments
source : debian-user-digest # 1214.

Modify /etc/rsyslog.conf :

*.*;!mail.none;auth,authpriv.none          -/var/log/syslog
 
 
Creative Commons License
This work by maniac.vardhan is licensed under a Creative Commons Attribution-NonCommercial-NoDerivs 3.0 Unported License.


how to stop debug level messages from the mail system to /var/log/syslog

0 comments
source : debian-user-digest # 1213.

Modify /etc/rsyslog.conf :

*.*;!mail.debug;auth,authpriv.none          -/var/log/syslog
 
 
Creative Commons License
This work by maniac.vardhan is licensed under a Creative Commons Attribution-NonCommercial-NoDerivs 3.0 Unported License.


how to check integrity of burned image & cmp : /dev/cdrom: Input/outputerror

0 comments
source : debian-user-digest # 1229,1230.

Use-case : I am trying :

$ cmp /dev/cdrom debian-505-powerpc-netinst.iso
This works on CD-RW, but it fails on CD-R with the following :
cmp: /dev/cdrom: Input/output error

[ A ] "checkiso" script : http://www.debian.org/CD/faq/index.en.html#verify

[ B ]
$ md5sum path-to-your-.iso-file

$ dd /dev/cdrom bs=$blocksize count=$blockcount conv=notrunc,noerror | md5sum 

The variable, $blocksize, $bolkcount, depend of the CD or DVD, to get this info :

$ isoinfo -d -i /dev/cdrom
the result must be the same.

[ C ] The advantage to using cmp is you get a byte by byte, exact match check.

$ dd /dev/cdrom bs=$blocksize count=$blockcount conv=notrunc,noerror | cmp - path-to-your-.iso-file
The above command the stdin from dd with the file.

Note : The issue with using cmp directly on the device has to do with how the device driver handles what would be considered EOF. All that happened in your cmp run was an attempt to read beyond the end of the device. Unless 'cmp' produced a "files differ: byte xxxx, line yyy" type of message, the 'cmp' actually succeeded in properly comparing the two images.
 
 
Creative Commons License
This work by maniac.vardhan is licensed under a Creative Commons Attribution-NonCommercial-NoDerivs 3.0 Unported License.


how to reinstall the configuration files for a package without runningthe purge command ?

0 comments
source : debian-user-digest # 1229.

( intentionally ? ) deleted configuration files will be installed again.
# aptitude -o DPkg::Options::="--force-confmiss" reinstall <pkg>
 
 
Creative Commons License
This work by maniac.vardhan is licensed under a Creative Commons Attribution-NonCommercial-NoDerivs 3.0 Unported License.


how to disable ip v6 using grub2 ?

0 comments
source : debian-user-digest # 1278.

Step 1 : Add the following line to /etc/default/grub and add it to the GRUB_CMDLINE_LINUX="root=/dev/somethin" line :
ipv6.disable=1

Step 2 : update grub :

# update-grub

Step 3 : reboot the system

# reboot
 
 
Creative Commons License
This work by maniac.vardhan is licensed under a Creative Commons Attribution-NonCommercial-NoDerivs 3.0 Unported License.